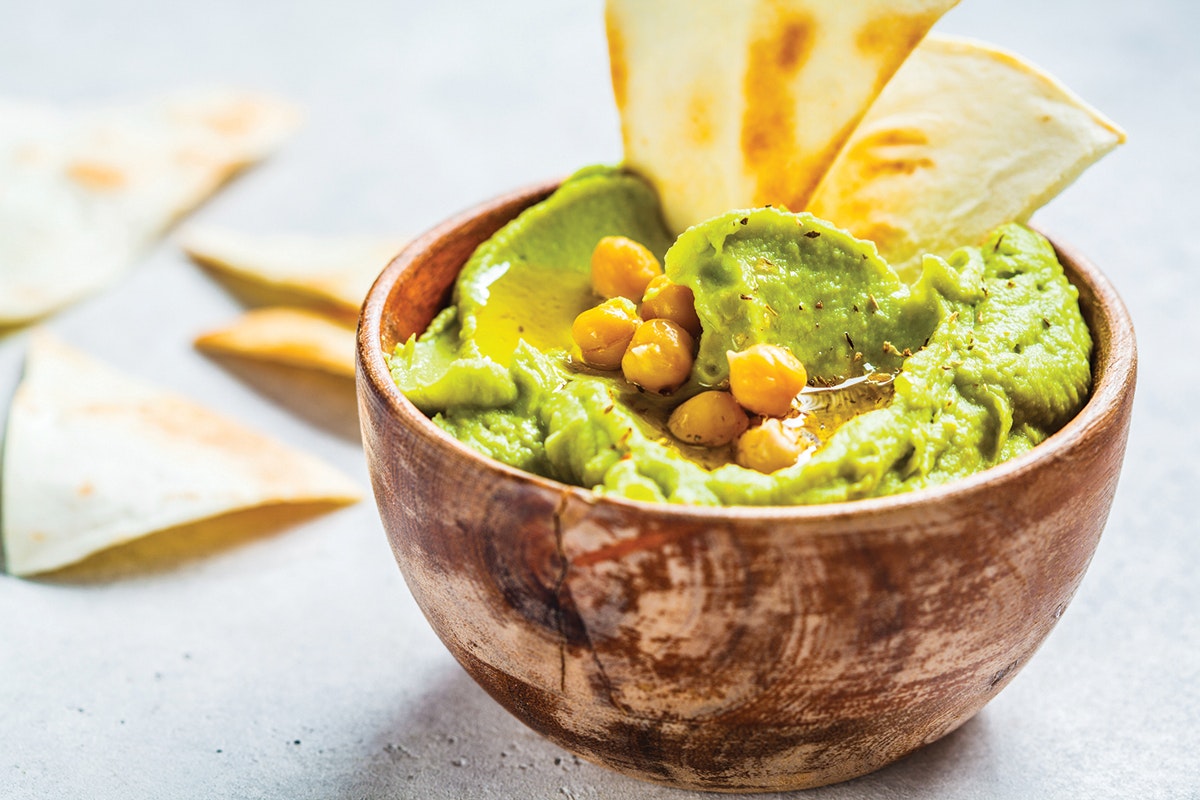
Scallions help make this oh-so-tasty twist on the traditional hummus mmmmm-memorable.
Buy some at the store, or grow your own…Cut off the green parts and save the white ends with the tiny roots. Pop in a glass of water and watch the greens regrow…even after just a few hours you’ll see a difference! Keep on snipping off the greens and those little white ends will keep producing for a long, long time!
Ingredients
1 garlic clove
1 15-oz can chickpeas, drained with liquid (aquafaba) reserved
Juice from 2 limes (about ¼ cup)
½ cup thinly-sliced green scallion rings
½ cup packed cilantro leaves and small stems
1 cup baby spinach leaves
1 cup baby arugula leaves
¼ cup tahini
¼ tsp cumin
¾ tsp salt
¼ -½ cup aquafaba (reserved from canned chickpeas)
Directions
Process garlic, cilantro, green onion, spinach and arugula in a food processor until finely chopped. Add chickpeas, lime juice, tahini, cumin, salt and ¼ cup chickpea aquafaba. Purée 30 seconds, scrape down sides and add 1-2 more Tbsp aquafaba as needed to make it nice and creamy. Can refrigerate 7-10 days as needed, but best when freshly made.
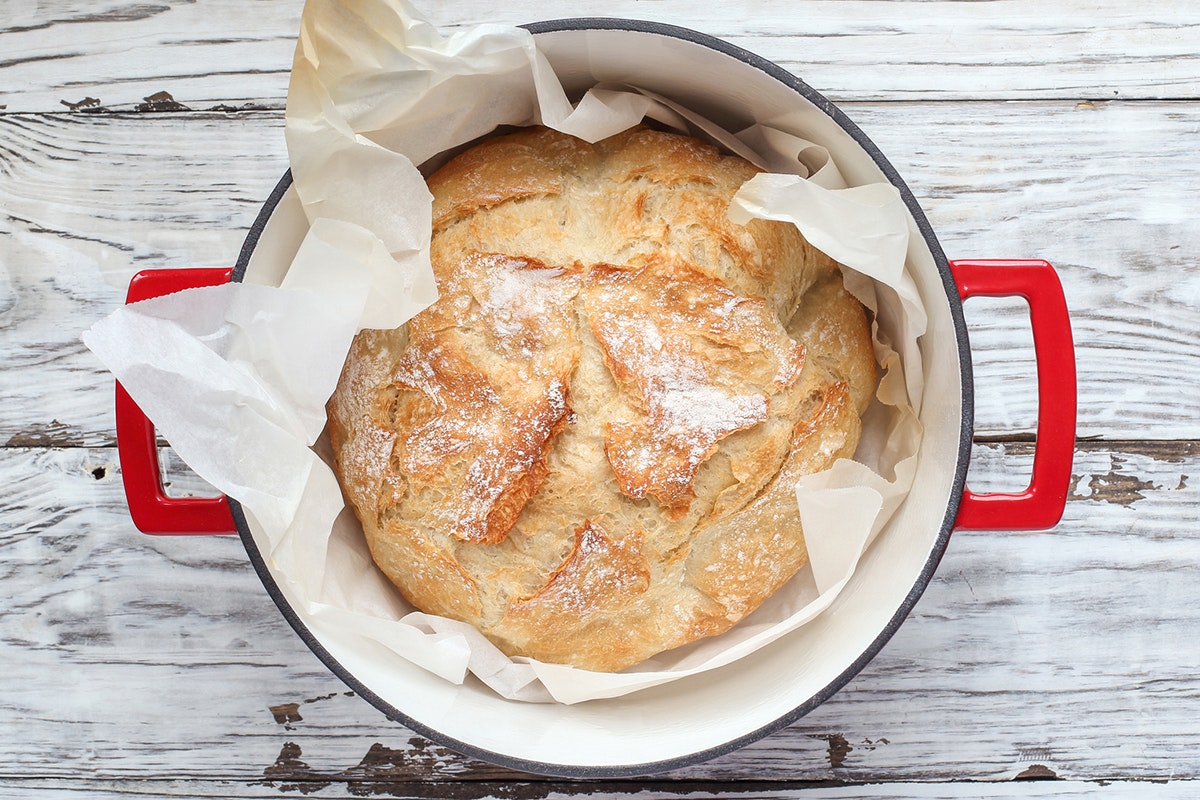
A boule is simply a round bread, but it elevates it dramatically when you add it to your culinary lexicon, along with some garlic or herbed compound butter for slathering.
Let the bread cool completely before slicing to truly enjoy the flavor and allow for proper slicing. Use a serrated knife, gently but deliberately “saw” back and forth in long strokes across the bread to create the pieces, rather than the “press and wiggle” technique, which will leave you with a smushed slice.
Pro tip #1: Baking by weight will produce a more consistent result. We highly recommend investing in a scale when doing any bread or pastry making.
Pro tip #2: Using metric measurements allows for much easier scaling up or down. No need to try to do math gymnastics with ounces and pounds!
Ingredients
3 cups (345 g) bread flour, plus more for shaping
1 Tbsp salt
1 ¼ tsp active dry yeast
1 ½ cups warm water
Directions
Whisk together bread flour, salt and yeast until combined. Pour in warm water and stir until you have a shaggy, sticky dough. Cover the bowl with a damp kitchen towel and set in a warm spot until dough doubles in size —2 to 6 hours.
Punch down dough. Shape into a ball, twisting the dough around on the countertop with your palms (the bottom of the dough stays in place). Place dough on a piece of parchment paper with a bit of flour on it. Cover with damp kitchen towel again.
Heat oven to 450°. Put a 6-quart Dutch oven with cover in the oven and allow it to heat up while the oven preheats.
Allow the dough to rest and rise for 30 minutes. At this point you may score the top layer of your dough using a lame or very sharp paring knife. Carefully remove hot! Dutch oven lid and place dough with parchment underneath in Dutch oven and close lid. Bake for 45 minutes. Remove lid and bake for another 10-15 minutes until the crust is golden brown and the bread sounds hollow when you tap it with a spoon.
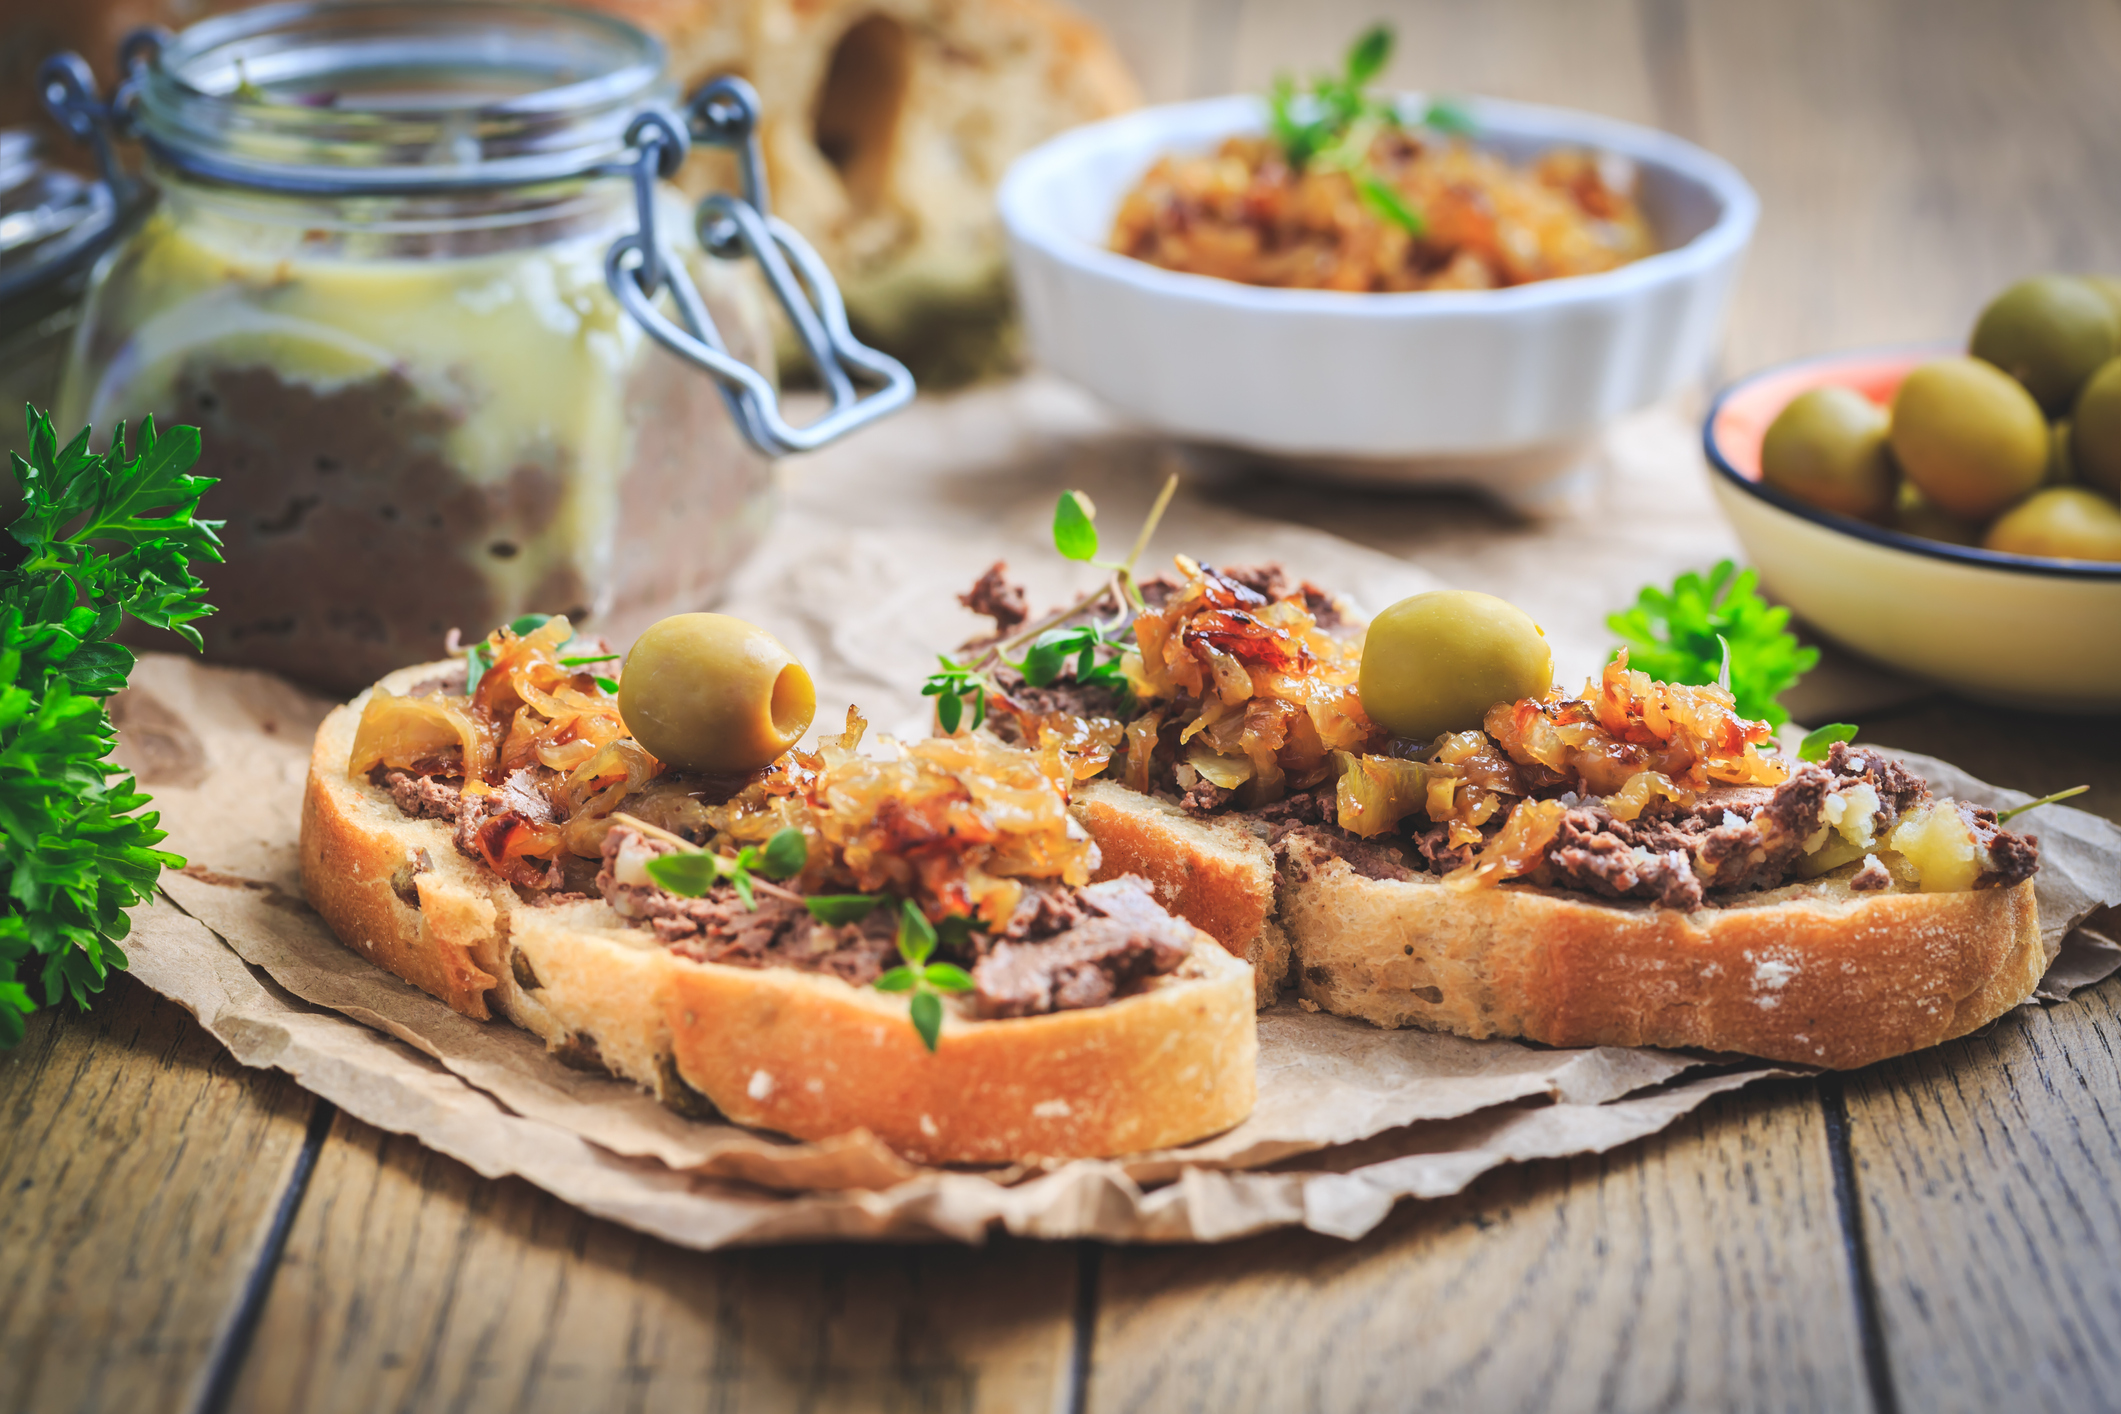
Open-Faced Koji Pâté Sandwich with Olives and Caramelized Onions
4-8 servings
Koji is a variety of molds – Aspergillus oryzae – that are used in fermentation and are safe to eat. It contains about fifty enzymes that break down starches in grains such as rice into sugars and makes these sugars available for yeasts to consume in the fermentation process. The use of koji dates to the 8th century, and it’s a vital ingredient in many traditional Japanese products such as pickles, sake, soy sauce and miso. If you’ve ever eaten any of these things, you’ve enjoyed the transformative process of koji.
The folks at Prime Roots have developed meat alternatives using koji, and the results are tasty and satisfying. BriarPatch carries their pâté products – Harvest and Black Truffle. Here’s a simple recipe using pâté that’s a great way to see what the Prime Roots version is all about.
Ingredients
8 slices crusty artisan bread
1 cup pitted green olives (we like Frescatrano or Castelventrano)
3 Tbsp olive oil, plus more for drizzling
1 bay leaf
2 large yellow onions, halved/sliced
¼ tsp sea salt
2 6 oz tubs Prime Roots Koji pâté
Fresh thyme sprigs, for garnish
Directions
Heat oil in a skillet over medium heat. Add onions and bay leaf and stir/cook for 5 minutes until starting to soften. Add salt, reduce heat to medium low and cook for 50-80 minutes or until onions are very soft, golden brown and caramelized. Stir every few minutes as you go. Timing will depend on your type of pan, size of onions and heat of your stove.
If onions start to stick to the pan, reduce heat to low. To speed things up after 50 minutes, turn heat higher for more caramelization and stir continuously to prevent burning. Remove from heat and allow to cool slightly. Discard bay leaf.
Slice bread, drizzle with a generous amount of olive oil and lightly toast in the oven on a sheet pan lined with parchment paper.
Remove bread from oven and spread each surface with pâté. Top each slice with caramelized onions, olives and thyme sprigs.
Oven-Roasted Potato Peels are so easy, you’re going to wonder where they’ve been all your life. Just peel potatoes – preferably organic – toss them with a little olive oil, salt and pepper, and roast them in the oven until they get crispy and start to curl up around the edges.
You can add a dusting of spices or fresh herbs once they’re out of the oven, but the earthy flavor of the peels with these simple adornments is the perfect foil for your favorite dip. Or, perch them atop a steaming bowl of the Basic New England Clam Chowder you can make with all of those potatoes you’ll have! You’ll find that recipe here.
Ingredients
2 cups potato peels
1 Tbsp olive oil – spray or pour
1 tsp salt
Pinch of black pepper
Directions
Preheat oven to 400°. Line an edged sheet pan with parchment paper.
Wash/scrub potatoes well to remove any dirt. Cut out any blemishes or sprouts with a small paring knife. Peel potatoes with a peeler so you get peels that don’t have too much potato flesh.
Soak peels for ½ hour in cold or room temperature water, to get rid of excess starch. Rinse the soaked peels and dry them with a kitchen towel and/or a salad spinner. Get peels as dry as possible, so the chips get really crisp.
Spread potato peels in a single layer on the sheet pan and drizzle/spray with oil, coating peels well but not weighing them down. Sprinkle with salt/pepper.
Bake potato peels for 15-18 minutes, turning half-way through so they cook evenly. Broil for a few minutes at the end to get them even more crispy, watching carefully so they don’t burn.
Notes: You can save up potato peels until you have the amount you want to use. Store in water in the refrigerator for up to 3 days, changing the water daily.
You can also make these in an air fryer, same temperature but they will be done much faster so keep an eye on them.
Whether you’re getting your feast together for the crowd coming to watch the big game, or you just want to have something delicious for dipping chips and veggies, this is a great go-to recipe with plenty of lime juice and zest to give it personality and zing.
Ingredients
3 ripe avocados
¼ cup finely chopped cilantro
¼ cup diced red onion
Juice and zest of 2 limes
1 small jalapeno pepper, seeded/deveined/diced or ½ of 4 oz can mild diced green chiles
½ tsp salt, plus more to taste
½ tsp ground cumin
½ tsp garlic granules
Optional: 1-2 Roma tomatoes seeded/diced
Directions
Combine avocados, lime juice/zest, salt, cumin and garlic granules in a large bowl. Mash until ingredients are combined but still have some texture.
Fold in cilantro, onion, jalapeno/chiles and tomatoes. Adjust seasoning and serve.
This is the perfect dipping sauce to enjoy with Tibetan Momos. Momos are dumplings that originated in Tibet and Nepal and are also popular in Bhutan and certain regions of India. They’re usually wrapped in a simple dough of white flour and water and are stuffed with combinations of veggies, tofu, meat or cheese such as Tibetan hard cheese or paneer. Get the momos recipe here.
Also great for spreading on anything where you want a little kick of heat with tomatoey goodness!
Ingredients
4 – 5 cloves garlic, chopped
½” piece ginger, chopped
1 Tbsp oil
¼ tsp – 1 Tbsp red pepper flakes – to taste
3 Tbsp hulled sesame seeds
14 oz can diced tomatoes
1 cup red onion, chopped
2 Tbsp tamari or soy sauce
2 Tbsp – ¼ cup fresh squeezed lemon juice – to taste
1 cup water
Directions
In a skillet over medium heat, heat oil, ginger and garlic. Cook until fragrant, 1-2 minutes. Add red pepper flakes and sesame seeds and toast 1 minute.
Add onion, sautéing 4 minutes until soft. Add tomatoes and sauté 4-5 minutes more until soft. Transfer mixture to a blender with tamari, lemon juice and water. Blend until smooth and add salt to taste. Use immediately or store in refrigerator until ready to use.